1. Log into Facebook
2. Enable developer mode, if you haven’t already. To do this, type “developer” into the Facebook search box, click the first result (it should be an app made by Facebook with a few hundred thousand users), and add the app
3. Jump into the developer app (if Facebook doesn’t put you there automatically, it should be in your left-hand tool bar)
4. Create a new app (don’t worry — you wont actually be submitting this for anyone else to see/use). Give your shiny new app any display name and namespace you see fit. Read through and agree to the Platform Privacy agreement. This is the step you need to be verified for.
5. Ensure you’re in your new app’s main settings screen. You should see your app’s name near the top of the page
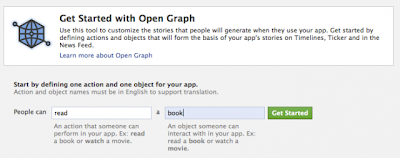
6. Look for the “Open Graph” header, and click the “Get Started using open graph” link.
Create a test action for your app, like “read” a “book”, or “eat” a “sandwich”
7. This should drop you into an action type configuration page. Change a few of the default settings (I changed the past tense of “read” to “redd” — again, only you can see this unless you try and submit your application to the public directory), and click through all three pages of settings
8. Wait 2-3 minutes
9. Go back to your Facebook homescreen. An invite to try Timeline should be waiting at the top of the page
And you’re done! We’ve seen this work quite a few times now, so it should work without a hitch for just about anyone.
You have read this article older
with the title How To Enable Facebook Timeline. You can bookmark this page URL https://angryblackmf.blogspot.com/2011/12/how-to-enable-facebook-timeline.html. Thanks!


No comment for "How To Enable Facebook Timeline"
Post a Comment